![01-manara-orange-1.jpg]](https://support.manara.tech/hs-fs/hubfs/01-manara-orange-1.jpg?width=227&height=122&name=01-manara-orange-1.jpg)
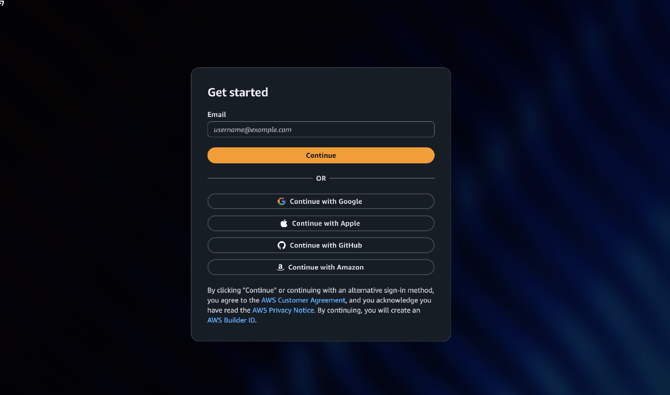
Step 1: Sign In or Create an Account
-
Go to the following link: https://aws.amazon.com/certification/certification-prep/testing/
-
On the "Get started" screen, enter your email address in the Email field.
-
Click Continue.
-
You may also sign in directly using Google, Apple, GitHub, or Amazon.
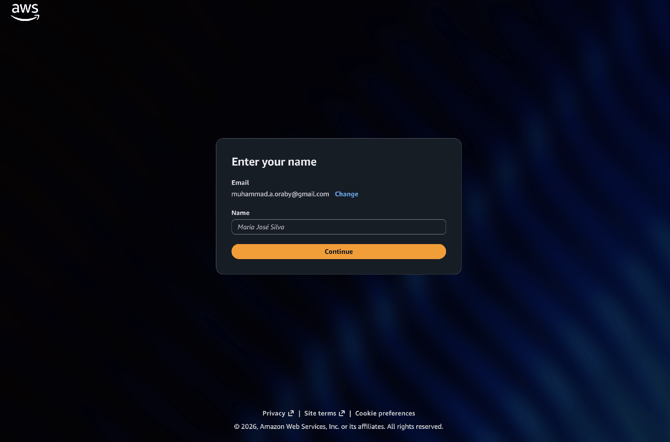
Step 2: Enter Your Name
-
Your email address will already be displayed, with an option to change it if needed.
-
In the Name field, enter your full name exactly as it appears on your official identification document, whether a national ID or a passport. This is critical, since any mismatch may cause issues on exam day.
-
Click Continue.
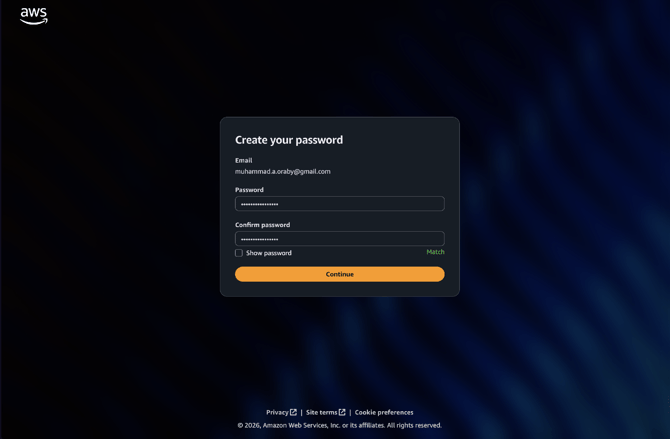
Step 3: Create Your Password
-
Enter a strong password in the Password field.
-
Re-enter the same password in the Confirm password field. A green label reading Match will appear once both entries match.
-
You may check Show password to verify what you typed.
-
Click Continue.
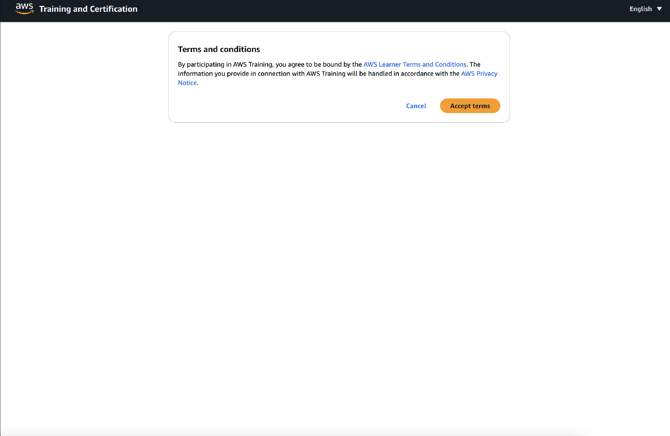
Step 4: Accept the AWS Terms and Conditions
-
You will be redirected to the AWS Training and Certification platform.
-
A box titled Terms and Conditions will appear, referencing the AWS Learner Terms and Conditions and the AWS Privacy Notice.
-
Click Accept terms to proceed, or Cancel if you wish to review them first.
Step 5: Required Information - Confirming Age and Agreement
-
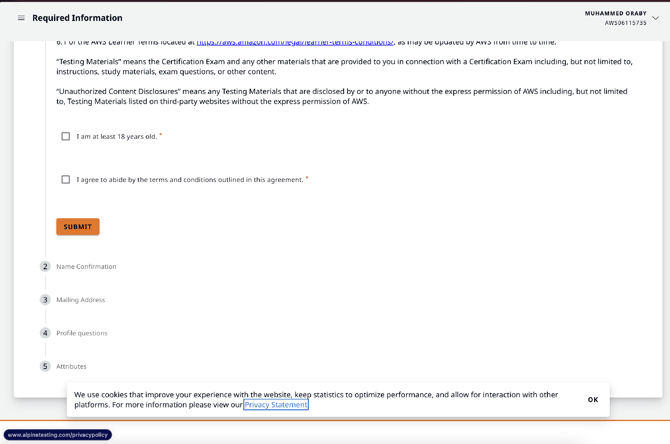
On the Required Information page, read through the AWS Certification Program Agreement.
-
Check the box labeled I am at least 18 years old.
-
Check the box labeled I agree to abide by the terms and conditions outlined in this agreement.
-
Click Submit.
-
This step begins a multi-step profile setup process that includes Name Confirmation, Mailing Address, Profile Questions, and Attributes.
Step 6: Name Confirmation
-
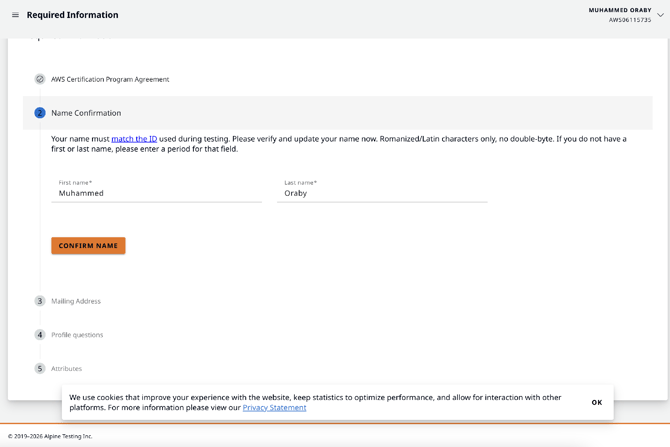
In the Name Confirmation section, enter your First name and Last name.
-
Your name here must match your official identification document exactly. Use Romanized or Latin characters only, with no double-byte characters.
-
If you do not have a first name or a last name, enter a period in that field.
-
Click Confirm Name.
Step 7: Dashboard Overview and Requesting Extra Time
-
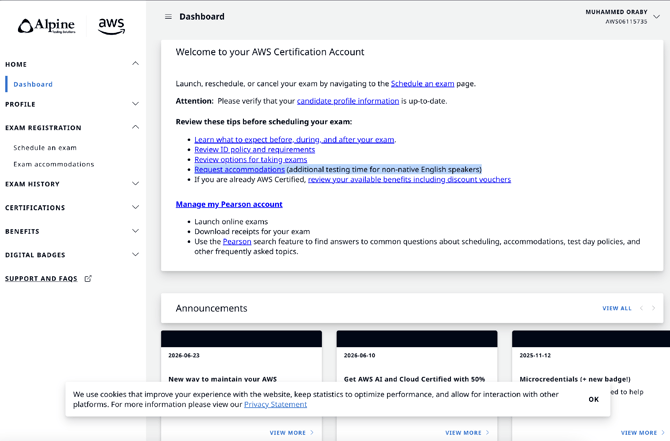
After completing your profile, you will land on the AWS Certification Account dashboard.
-
From here, you can launch, reschedule, or cancel an exam through the Schedule an exam page, and verify that your candidate profile information is up to date.
-
You can also access Manage my Pearson account to launch online exams or download receipts.
-
If your native language is not English, click Request accommodations to apply for an additional thirty minutes on your exam, known as ESL +30. This request only needs to be submitted once, and it will automatically apply to all future exam registrations with both Pearson VUE and PSI.
Step 8: The ESL +30 Accommodation Page
-
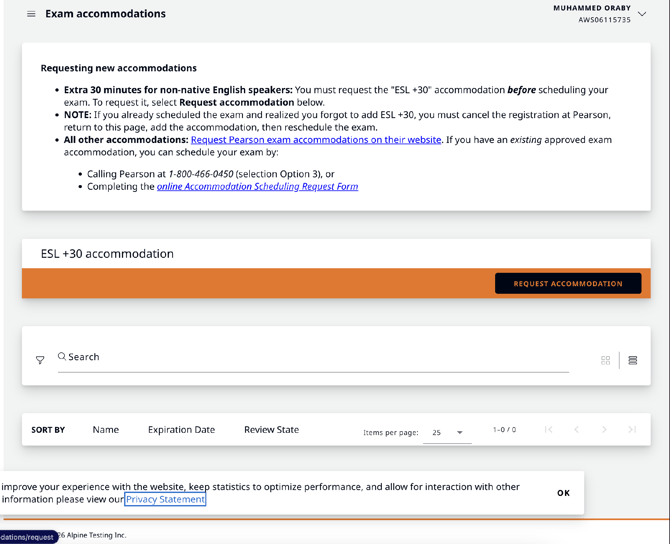
On the Exam accommodations page, you will find the ESL +30 accommodation section.
-
Click Request accommodation to submit your request.
-
Important: you must request the ESL +30 accommodation before scheduling your exam. If you already scheduled your exam and forgot to add ESL +30, you must cancel your registration with Pearson, return to this page to add the accommodation, then reschedule the exam.
-
Other accommodation requests can be made by calling Pearson at 1-800-466-0450, selection option 3, or by completing the online Accommodation Scheduling Request Form.
Step 9: Submit the ESL +30 Accommodation Request
-
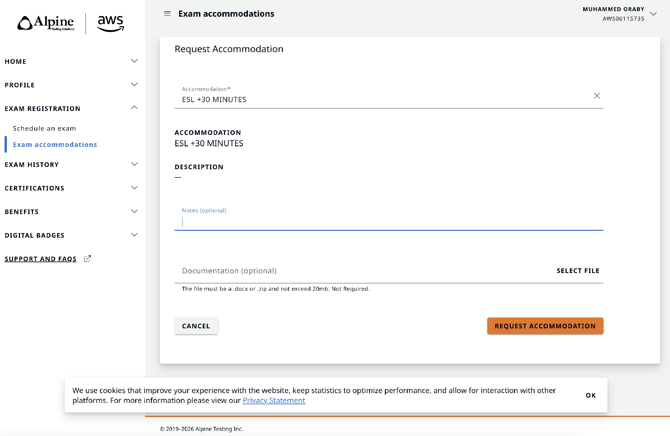
On the Request Accommodation form, ESL +30 MINUTES will already be selected as the accommodation type.
-
You may optionally add notes if needed.
-
You may optionally upload supporting documentation in docx or zip format, with a maximum size of twenty megabytes. This is not required.
-
Click Request Accommodation to submit.
Step 10: Schedule an Exam
-
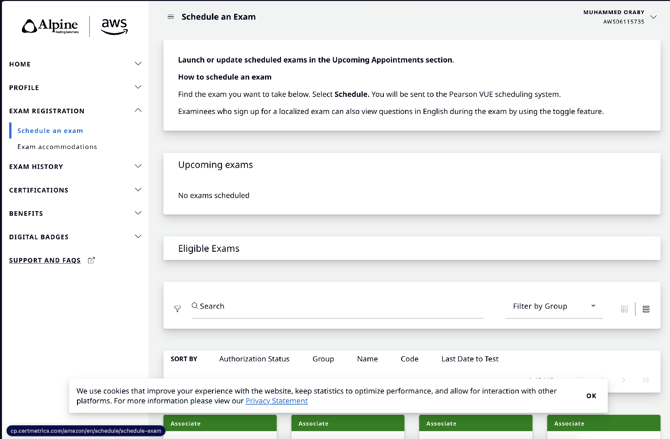
From the left-side menu, click Schedule an exam.
-
This page shows Upcoming exams, which lists any exams already scheduled, and Eligible Exams, a list of all exams you are eligible to take, which you can search or filter by group.
-
Find the exam you wish to take, then click Schedule.
-
You will be redirected to the Pearson VUE scheduling system to continue the booking process.
Step 11: Choose the Exam You Want to Take
-
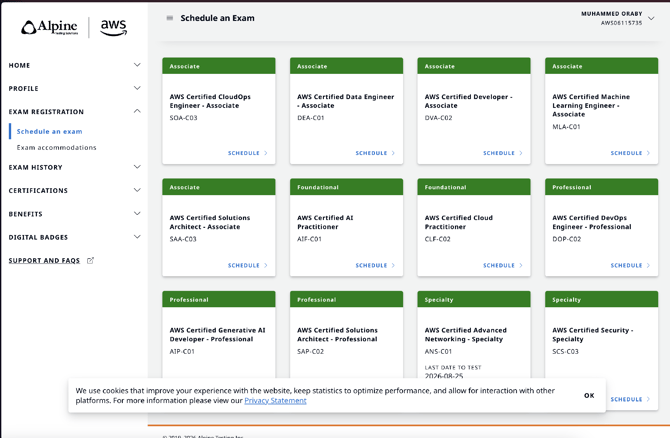
Browse the list of eligible exams, organized by level: Foundational, Associate, Professional, and Specialty.
-
Available exams include AWS Certified Cloud Practitioner, AWS Certified AI Practitioner, AWS Certified Solutions Architect - Associate, AWS Certified Developer - Associate, AWS Certified Machine Learning Engineer - Associate, AWS Certified DevOps Engineer - Professional, AWS Certified Security - Specialty, and others.
-
Find the exam matching your certification track, then click Schedule.
-
Some exams display a Last Date to Test. Be sure to book your exam before that deadline.
Step 12: Select Exam Options
-
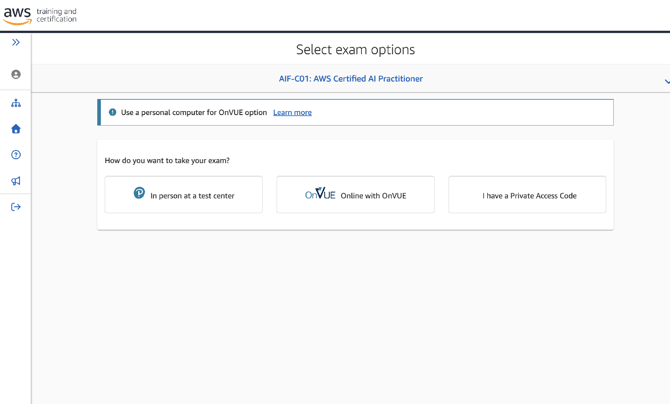
On the Pearson VUE Select exam options page for the exam you selected, choose how you want to take your exam.
-
In person at a test center: attend a physical Pearson VUE testing location.
-
Online with OnVUE: take the exam remotely using your own computer. This option requires a personal computer.
-
I have a Private Access Code: use this option if you were given a special access code for a private exam session.
Step 13: Prepare to Take Your Exam with OnVUE
-
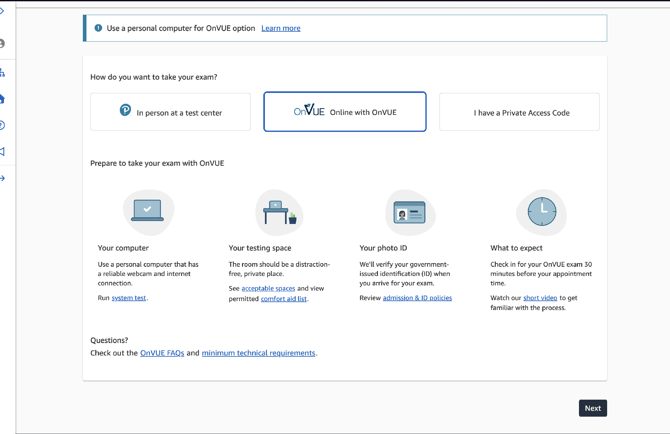
After selecting Online with OnVUE, review the preparation checklist before clicking Next.
-
Your computer: use a personal computer with a reliable webcam and internet connection. Run the system test beforehand.
-
Your testing space: the room must be distraction-free and private. Review the acceptable spaces and the permitted comfort aid list.
-
Your photo ID: a government-issued identification document will be verified on exam day. Review the admission and ID policies.
-
What to expect: check in for your exam thirty minutes before your appointment time. Watch the short video to become familiar with the process.
-
For further assistance, review the OnVUE FAQs and the minimum technical requirements.
Step 14: Select Exam Language
-
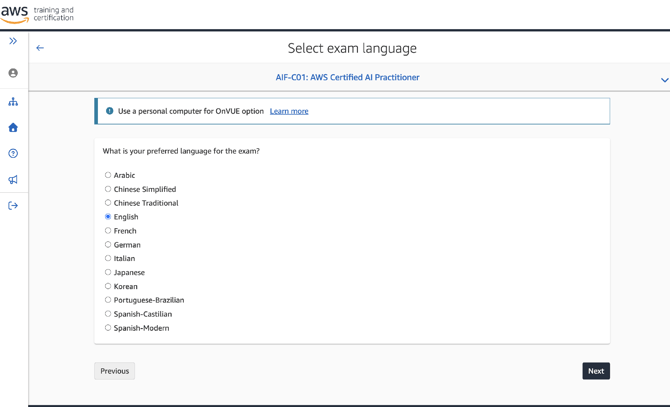
Choose your preferred exam language from the available options, including Arabic, Chinese Simplified, Chinese Traditional, English, French, German, Italian, Japanese, Korean, Portuguese-Brazilian, Spanish-Castilian, and Spanish-Modern.
-
Most learners select English, particularly those following the AI or ML certification track.
-
Click Next to continue.
Step 15: Agree to Online Exam and AWS Policies
-
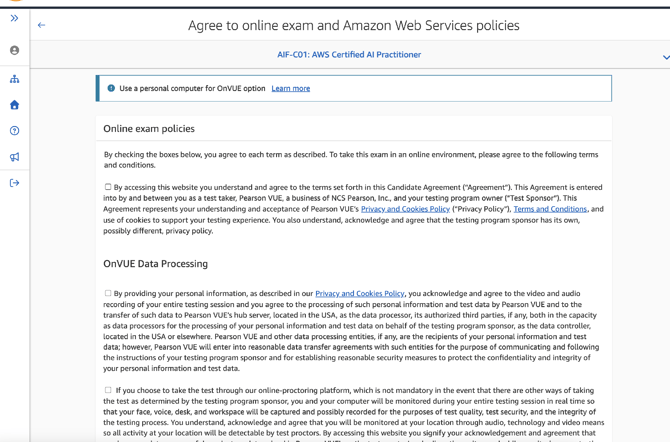
Read through the Online exam policies and OnVUE Data Processing sections carefully.
-
Check all required boxes, including agreement to the Candidate Agreement, Pearson VUE's Privacy and Cookies Policy, and Terms and Conditions.
-
Consent to video and audio recording of your entire testing session is required for online proctoring.
-
You must also acknowledge that you will be monitored in real time, including your face, voice, desk, and workspace, for test security purposes.
-
Scroll down to check any remaining required boxes, then click Next.
Step 16: Select Proctor Language
-
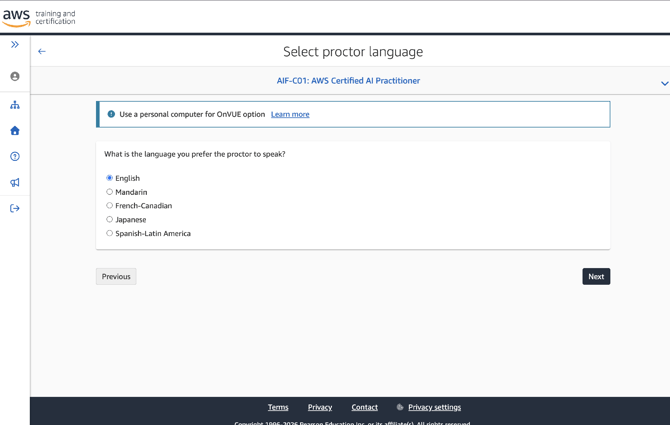
Choose the language you would prefer the proctor, the person monitoring your exam, to speak: English, Mandarin, French-Canadian, Japanese, or Spanish-Latin America.
-
This is separate from your exam language, and relates to communication with the proctor in case any issues arise during the session.
-
Click Next.
Step 17: Confirm Your Time Zone
-
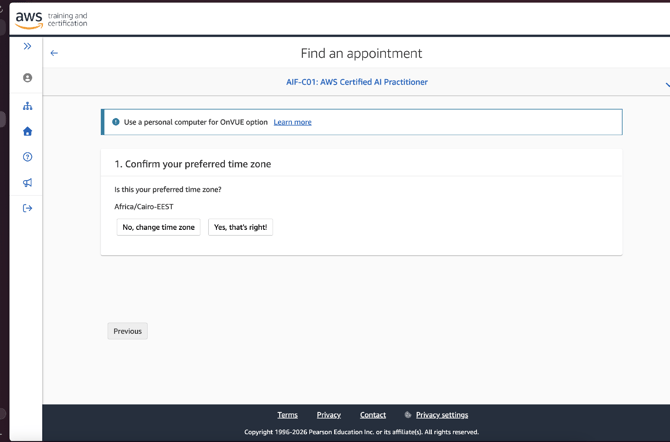
On the Find an appointment page, confirm your preferred time zone, for example Africa/Cairo-EEST.
-
Click Yes, that's right! if the detected time zone is correct.
-
Click No, change time zone if you need to select a different one.
Step 18: Select Your Exam Date and Time
-
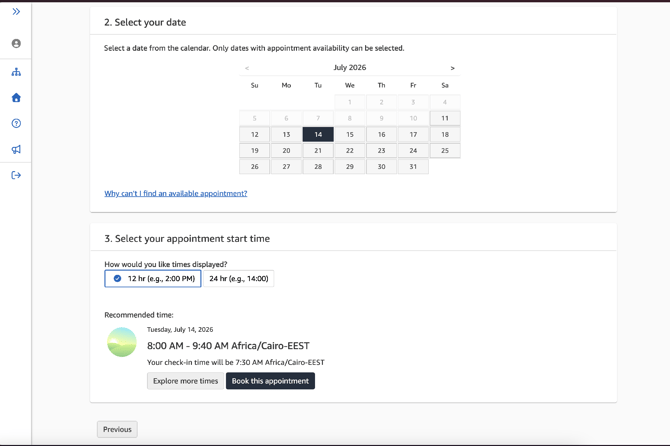
Select a date from the calendar. Only dates with available appointments can be selected.
-
Choose how you would like the time displayed, either twelve-hour format, for example two PM, or twenty-four-hour format, for example fourteen hundred hours.
-
A recommended time will be suggested, along with your required check-in time, which is usually thirty minutes before the exam start time.
-
You may click Book this appointment to confirm the recommended slot, or click Explore more times to view other available time slots.
-
If no dates appear available, review the Why can't I find an available appointment? link for guidance.
Step 19: Review Your Cart
-
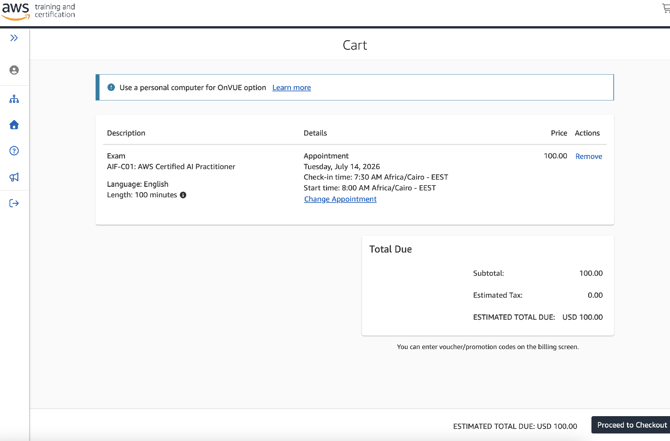
On the Cart page, review all exam details before proceeding, including the exam name and code, the appointment date, check-in time, and start time, the confirmed exam language, the exam length in minutes, and the exam price.
-
If you need to make changes, click Change Appointment, or click Remove to cancel this item from the cart.
-
Any voucher or promotion codes are entered on the next billing screen, not on this page.
-
Once everything is correct, click Proceed to Checkout.
Step 20: Enter Payment and Billing - Add Your Voucher
-
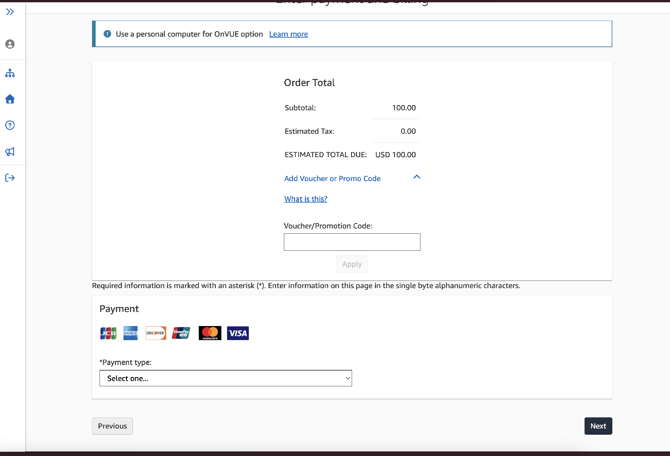
On the Enter payment and billing page, review your Order Total, including the subtotal, estimated tax, and estimated total due.
-
Click Add Voucher or Promo Code to expand the voucher field.
-
In the Voucher/Promotion Code box, enter the exam voucher code you received.
-
Click Apply.
-
Once the voucher is applied successfully, your Estimated Total Due should update to zero, fully covered by the voucher.
-
Under Payment, select a payment type from the dropdown. This is required even if the voucher covers the full amount, as the system still requires a payment method on file.
-
Click Next to continue.
-
Note: only your own assigned voucher code should be used. Never share or use another person's voucher, as this may invalidate exam results.
Alternative Step: In Person at a Test Center - Preparation
-
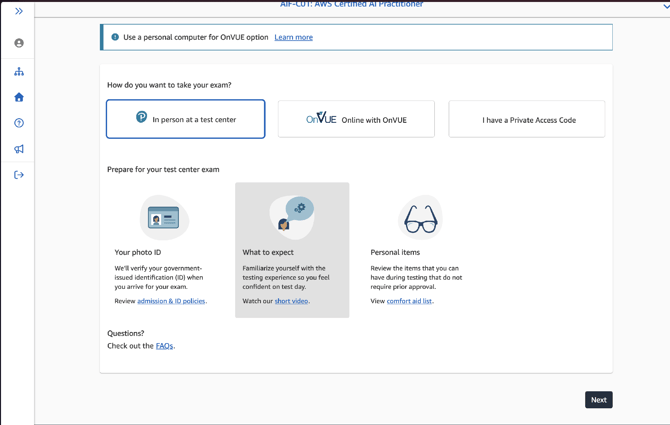
If you select In person at a test center instead of Online with OnVUE, review the following checklist before clicking Next.
-
Your photo ID: a government-issued identification document will be verified when you arrive. Review the admission and ID policies.
-
What to expect: familiarize yourself with the testing experience by watching the short video.
-
Personal items: review the comfort aid list for items you are permitted to bring without prior approval.
-
For further assistance, check the FAQs.
-
Once ready, click Next. You will then be asked to select a nearby test center, similar to the OnVUE flow but with an added location step.
Alternative Step: Select Exam Language (Test Center)
-
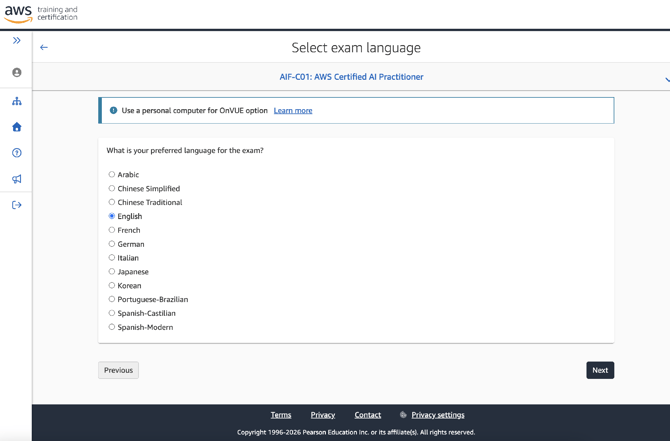
Choose your preferred exam language from the list, including Arabic, Chinese Simplified, Chinese Traditional, English, French, German, Italian, Japanese, Korean, Portuguese-Brazilian, Spanish-Castilian, and Spanish-Modern.
-
Click Next to continue.
-
This step is identical whether you chose the test center option or the OnVUE option.
Alternative Step: Agree to Policies (Test Center)
-
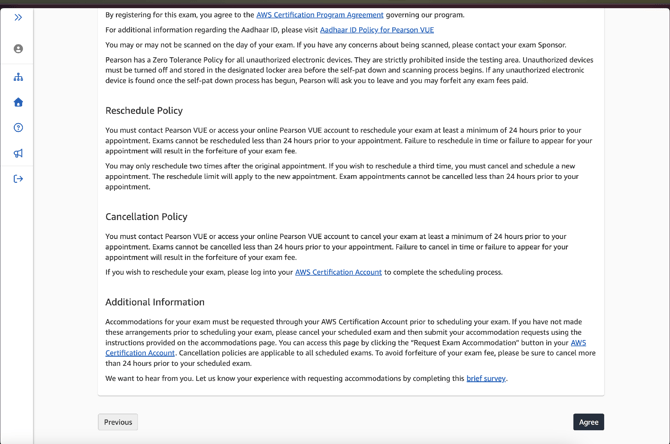
Review the important policies before agreeing.
-
Zero Tolerance Policy: unauthorized electronic devices are strictly prohibited inside the testing area and must be turned off and stored before the security check begins.
-
Reschedule Policy: you must reschedule at least twenty-four hours before your appointment. Failure to do so will result in forfeiture of your exam fee. You may only reschedule twice; a third change requires cancelling and booking a new appointment.
-
Cancellation Policy: you must cancel at least twenty-four hours before your appointment through your Pearson VUE account or by contacting them directly. Otherwise, your exam fee will be forfeited.
-
Additional Information: any accommodations must be requested before scheduling your exam, through your AWS Certification Account.
-
Once reviewed, click Agree to proceed.
Alternative Step: Choose a Test Center Location
-
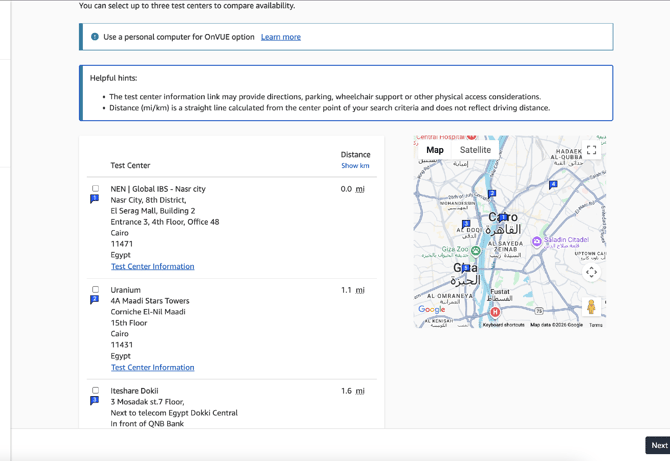
A list of nearby test centers will appear based on your location, showing the name and address of each center, the distance from your search location, which is a straight-line distance rather than a driving distance, a Test Center Information link for directions, parking, and wheelchair access, and a map showing all locations.
-
You may select up to three test centers to compare their available appointment slots.
-
Check the box next to your preferred center or centers.
-
Click Next to view available dates and times for the selected center or centers.
Alternative Step: Select Date, Time, and Confirm Booking (Test Center)
-
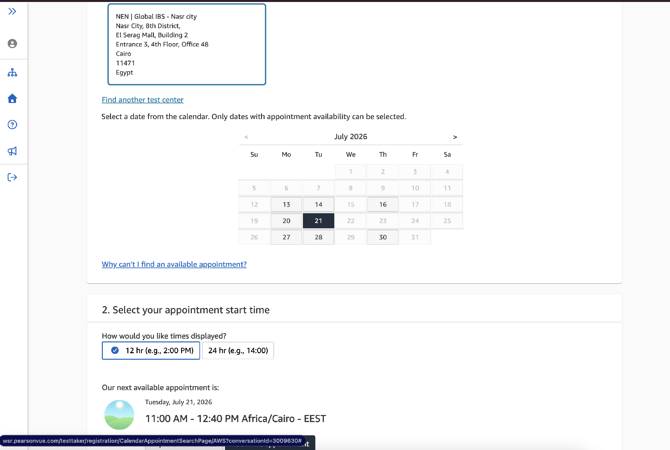
After choosing your test center, you may click Find another test center if you would like to change it.
-
Select an available date from the calendar. Only dates with available slots can be selected.
-
Choose your preferred time display format, twelve-hour or twenty-four-hour.
-
Review the suggested next available appointment, including date, time, and time zone.
-
Click Book this appointment to confirm the suggested slot, or click Explore more times to browse other available slots.
-
From here, the remaining steps are the same as the online exam flow: review your Cart, add your voucher code on the payment and billing page, select a payment type, and confirm your final booking.
-
Once confirmed, you will receive a confirmation email containing all your exam appointment details.